Introduction
Who doesn’t love the irresistible aroma of freshly baked cookies filling the house? Now, imagine that feeling taken up a notch—warm, gooey chocolate chip cookie, served straight from the skillet. Sounds like dessert heaven, right? This Chocolate Chip Skillet Cookie isn’t just any cookie. It’s got everything you love about a classic chocolate chip cookie but in a fun, one-pan wonder. Think crispy edges, soft and melty center, and the perfect balance of sweet, chocolatey goodness. Plus, it’s easy to whip up, and perfect for sharing (or, you know, keeping all to yourself). Ready to get baking? Let’s dive in!
Table of Contents
What You’ll Need

Before you get your skillet sizzling, let’s go over what you’ll need to make this cookie magic happen. Don’t worry, this recipe uses simple ingredients you probably already have in your kitchen. You’ll be just a few steps away from chocolate chip bliss!
The Basics:
- Butter (1 cup, softened): This adds that melt-in-your-mouth richness.
- Granulated Sugar (¾ cup): For sweetness and that classic cookie texture.
- Brown Sugar (¾ cup): Adds moisture and a hint of caramel flavor.
- Egg (1 large): This binds everything together while adding richness.
- Vanilla Extract (2 teaspoons): A must for that classic cookie taste.
- All-Purpose Flour (2 ¼ cups): The base for your dough, giving it structure.
- Baking Soda (1 teaspoon): For that perfect rise and slight fluffiness.
- Salt (½ teaspoon): A pinch is all you need to balance the sweetness.
And of course…
- Chocolate Chips (2 cups): The star of the show! Use semi-sweet for that perfect mix of sweetness, or go for milk chocolate or dark if you’re feeling adventurous.
Optional Add-Ins (because why not make it extra delicious?):
- Chopped Nuts (1 cup): Walnuts or pecans work wonders if you love a little crunch with your cookie.
- Caramel Bits or Chunks: For a buttery, gooey twist that’ll make your taste buds dance.
Once you’ve gathered all these ingredients, you’re just about ready to get started. And trust me, this will be the easiest (and most fun) cookie you’ve ever made!
How to Make a Chocolate Chip Skillet Cookie

Alright, now that you’ve got all your ingredients together, let’s get down to the fun part: making this giant, gooey, skillet cookie! Don’t worry—this is as easy as tossing the ingredients together and letting the oven work its magic.
1. Preheat the Oven and Prepare Your Skillet
First things first, preheat your oven to 350°F (175°C). This is key to getting that perfectly baked cookie. While the oven’s warming up, grab your trusty cast-iron skillet (about 10 inches works great) and give it a quick coat of butter or non-stick spray. This will help keep your cookie from sticking, and trust me, nobody wants to leave any of that gooey goodness behind.
2. Mix Your Wet Ingredients
In a large mixing bowl, beat together your softened butter, granulated sugar, and brown sugar until the mixture is smooth and creamy. I like to use an electric mixer for this, but a good old wooden spoon will work too—just give it some elbow grease! Once that’s all blended, beat in the egg and vanilla extract. You’ll know it’s ready when it looks like a light, fluffy cloud of sweetness.
3. Add the Dry Ingredients
Now, it’s time to get those dry ingredients involved. In a separate bowl, whisk together the flour, baking soda, and salt. Slowly add this dry mixture into the wet ingredients, mixing just until combined. Don’t overdo it—just enough to make the dough come together. Pro tip: If you’ve got a couple of lumps, that’s totally fine. A cookie dough with a little character is always better, right?
4. Fold in the Chocolate Chips
The best part—add in those chocolate chips! You can mix them in with a spatula or your hands if you’re feeling a bit wild. Make sure every bite will have a delicious dose of melty chocolate. If you’re going for extra (and who isn’t?), now’s the time to add any optional add-ins like nuts or caramel bits.
5. Bake the Cookie
Transfer your dough into the prepared skillet, spreading it evenly. The dough will spread as it bakes, so don’t worry if it looks like it’s not quite covering the skillet. Pop it into the preheated oven and bake for about 20–25 minutes, or until the edges are golden brown and the center is still a little soft. Remember: the cookie will continue cooking in the skillet even after you take it out, so don’t overbake!
Master the art of Twice-Baked Potatoes with this comprehensive guide from Peppery Recipes!
Why a Skillet Makes it Better

Now, I know what you’re thinking—why not just bake this cookie on a regular baking sheet like usual? Well, let me tell you: the skillet method takes this cookie to a whole new level. There’s something about the way it bakes in a cast-iron skillet that makes it extra special. Let’s break it down.
Even Heat Distribution
One of the best things about using a skillet is the even heat distribution. Cast iron is known for holding and distributing heat so well, meaning your cookie bakes consistently from the center to the edges. No more worrying about hot spots or uneven baking. You get that perfect golden-brown crispy edge with a soft, chewy center that you just can’t achieve with a regular cookie sheet.
Crispy Edges and Soft Center
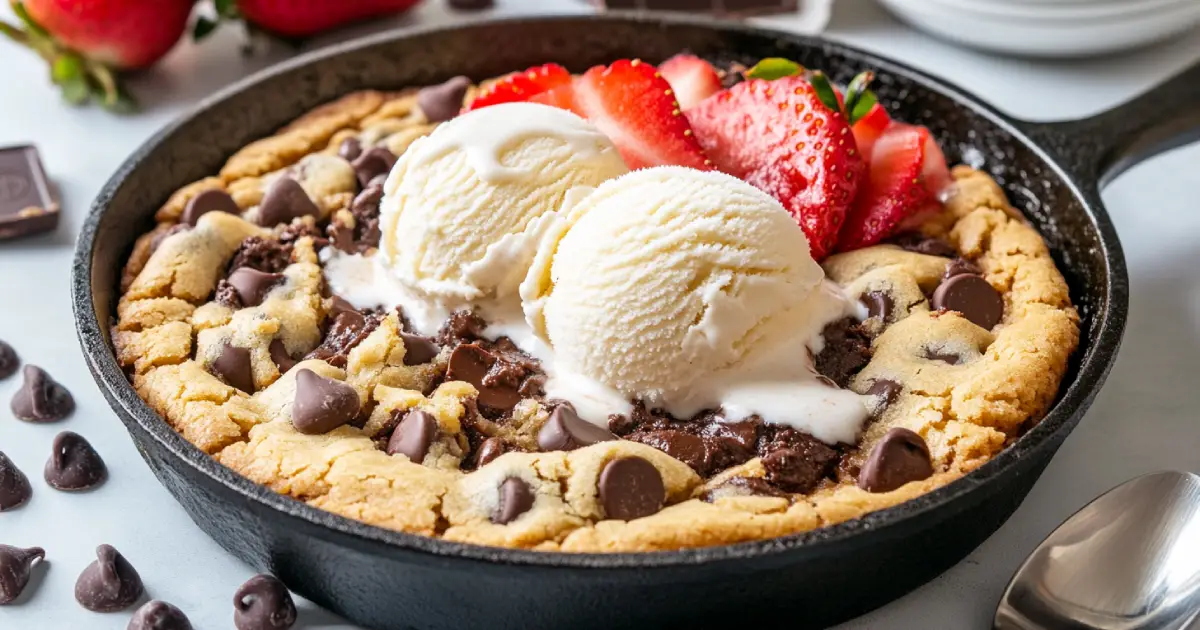
A skillet cookie is the ultimate combination of textures. The edges? Crispy, slightly caramelized, and oh-so-satisfying. The center? Soft, gooey, and a total chocolate lover’s dream. When you bake it in a skillet, the dough spreads out a little more slowly, giving those edges time to crisp up just right, while the inside stays deliciously underbaked (in the best way possible). It’s the kind of cookie that’s begging for a scoop of ice cream on top.
Perfect for Sharing (or Not!)
Let’s be real: a skillet cookie is kind of like a big cookie cake. It’s baked in one pan, so it’s perfect for slicing and sharing. Whether you’re serving it at a family dinner, a game night, or just to treat yourself, everyone can grab a piece (or two). Plus, it’s a lot more fun to serve it directly from the skillet—it’s like a dessert party in a pan. If you’re feeling generous, that is. No one will judge you if you decide to keep it all for yourself.
Serving Suggestions
Alright, your skillet cookie is fresh out of the oven, golden and gooey. But the fun doesn’t stop there! This cookie is basically a dessert canvas, and there are so many ways you can dress it up to make it even more delicious (not that it needs any help, but hey, why not go all out?). Here are a few ideas to take your Chocolate Chip Skillet Cookie to the next level:
A Scoop of Ice Cream
This is the classic move, and for good reason. A warm cookie and a cold scoop of vanilla ice cream is basically dessert perfection. It’s the ultimate indulgence, and if you’re feeling fancy, you can drizzle some hot fudge or caramel sauce over the top. You can even go for a fun twist like chocolate or mint chip ice cream for an extra layer of flavor. Trust me, it’s worth it.
Sprinkle of Sea Salt
Sounds fancy, right? But trust me—adding a tiny sprinkle of flaky sea salt on top of your warm cookie just brings out the chocolate flavor in a way you won’t believe. It’s like sweet and salty magic happening right in your mouth. Just a pinch will do, and it’s a simple way to elevate (oops, sorry—I mean, make it extra) your cookie experience.
Whipped Cream or Chocolate Drizzle
For those of you who like a little extra sweetness, try topping your skillet cookie with a dollop of whipped cream. It’s light and creamy, which balances out the richness of the cookie. Or, if you’re a chocoholic like me, go ahead and drizzle some melted chocolate over the top for that ultimate chocolate overload.
Berries (Yes, Really!)
Hear me out—berries and cookies? It’s a thing. You can top your skillet cookie with fresh berries like raspberries or strawberries for a burst of freshness. The slight tartness of the fruit pairs surprisingly well with the sweet chocolate, and it’s a great way to add a pop of color to your dessert spread.
Serve It Straight From the Skillet
This one’s for all my “I’m-too-hungry-to-wait” folks—don’t even bother cutting it. Just grab some spoons, pass them around, and scoop out that cookie straight from the skillet. It’s warm, gooey, and totally shareable (or not, your call). No need for plates, just pure, unadulterated cookie goodness.
Tips for the Perfect Skillet Cookie
Want to make sure your skillet cookie turns out just right every time? Here are a few tips and tricks that will have you baking like a pro. Trust me, these little touches make a big difference.
1. Use Room Temperature Butter
It’s easy to forget, but using butter that’s softened to room temperature is crucial. Cold butter won’t blend as well into the sugar, and you’ll end up with a more dense, less spreadable dough. Room temperature butter mixes in better, giving you that light and chewy texture that makes a cookie irresistible.
2. Don’t Overmix the Dough
When you’re adding the dry ingredients to the wet ingredients, mix just until it’s combined. Overmixing can cause your dough to be tough, and no one wants a tough cookie. So, stir gently, and keep that dough light and airy.
3. Adjust the Baking Time for Your Oven
Every oven bakes a little differently. Start checking your cookie around the 20-minute mark, but don’t be afraid to give it an extra 3-5 minutes if needed. If you prefer a more gooey center, you can pull it out sooner. If you like your edges a little extra crispy, leave it in longer. Trust your gut (and your nose) to know when it’s ready!
4. Let It Cool (Just a Little)
I know it’s tempting, but try to let your cookie cool for a few minutes before slicing into it. This gives the chocolate chips time to set a little, and it makes for cleaner, less melty slices. However, don’t wait too long—the best part about a skillet cookie is that warm, gooey center!
5. Add a Dash of Cinnamon or Espresso Powder
Here’s a sneaky secret: a dash of cinnamon or espresso powder in the dough can really bring out the flavor of the chocolate. Don’t worry, it won’t taste like cinnamon rolls or coffee—it just deepens the overall flavor of your cookie, making it even more decadent.
6. Customize Your Cookie
One of the best things about a skillet cookie is how easily you can customize it to fit your tastes. Want a gooey center? Skip the nuts. Prefer a little crunch? Add some roasted pecans. Don’t love too much chocolate? Swap in some peanut butter chips or butterscotch for a fun twist. This cookie is all about making it your own.
Explore a world of sweet indulgence with delicious Dessert Recipes at Peppery Recipes!
Frequently Asked Questions (FAQs)
I get it—sometimes you need a little more info before jumping into baking a delicious chocolate chip skillet cookie. So, I’ve rounded up some of the most common questions people have when making this treat. Let’s clear things up!
Can I Make the Dough Ahead of Time?
Absolutely! If you’re looking to save time, you can prepare the dough ahead of time and store it in the fridge. Just make sure it’s covered tightly, and it’ll stay fresh for about 2-3 days. When you’re ready to bake, just bring it to room temperature for about 10-15 minutes, and pop it in the oven as usual.
Can I Make This Without a Skillet?
If you don’t have a skillet, no worries! You can easily bake this cookie on a regular baking sheet. Just spread the dough onto the sheet lined with parchment paper, and bake at the same temperature. Your cookie might be a bit thinner, but it’ll still be just as delicious. Plus, you won’t miss out on the fun of a warm, gooey center!
What Can I Use Instead of Chocolate Chips?
You can totally mix it up! Instead of chocolate chips, try using peanut butter chips, white chocolate chips, butterscotch chips, or even a mix of all of them. You can also add crushed-up candy bars, M&Ms, or your favorite nuts. The possibilities are endless, so get creative!
How Do I Store Leftovers?
If you somehow have leftovers (lucky you!), store them in an airtight container at room temperature for up to 3-4 days. If you want to keep it fresh longer, you can store the cookie in the fridge for up to a week. To reheat, just pop a slice in the microwave for a few seconds, and it’ll taste almost as fresh as when you first baked it.
Can I Freeze the Cookie Dough?
Yes, indeed! You can freeze the dough for up to 3 months. To freeze, scoop the dough into balls and place them on a baking sheet to freeze individually. Once they’re solid, transfer the dough balls to a freezer-safe bag. When you’re ready to bake, just drop the frozen dough balls into your skillet and bake for an extra couple of minutes. No thawing necessary!
Conclusion: The Ultimate Dessert for Any Occasion
And there you have it! You’ve just mastered the art of the chocolate chip skillet cookie—no complicated steps, no tricky ingredients, just pure, delicious comfort in a pan. Whether you’re making it for a casual family dessert, a special celebration, or just because you need something sweet (and who doesn’t?), this skillet cookie is sure to impress.
It’s got everything you want in a dessert: warm, gooey chocolate, crispy edges, and that delightful contrast of textures. Plus, with the freedom to add your own personal twist, it’ll never get boring.
So, next time you’re craving something sweet, skip the store-bought cookies and whip up this homemade skillet wonder. Serve it with a scoop of ice cream, a sprinkle of sea salt, or just a spoon—you can’t go wrong. You’ll be the hero of dessert, and everyone will be asking for the recipe (and if you’re like me, you’ll happily share it because, you know, it’s just that good).